The 10-Inch Kitchen Paper or Bathroom Towel Rack Wall Mount Paper Towel Holder Dispenser from Billvoth.com is a great choice for a bathroom tool rack. This rack is made of high-quality stainless steel and comes with a 3M self-adhesive backing that can be used to attach it to walls or under cabinets. It can be used in the kitchen, pantry, utility room, laundry, and garage, making it a versatile and useful tool.
The 10-Inch Kitchen Paper or Bathroom Towel Rack Wall Mount Paper Towel Holder Dispenser is easy to install and can be used to store towels, washcloths, cleaning supplies, and other bathroom items. It is also rust-resistant, so it will last for years to come. Plus, it is affordable, with a price of just $19.99.
A bathroom tool rack is a great way to keep your bathroom organized and clutter-free. The 10-Inch Kitchen Paper or Bathroom Towel Rack Wall Mount Paper Towel Holder Dispenser from Billvoth.com is an affordable and stylish way to do just that. With its 3M self-adhesive backing, it can be easily installed in any bathroom, and it is sure to last for years to come.
]]>These are PERFECT! exclaimed my brother when he bit into my pumpkin snickerdoodles. Ive made various different snickerdoodles in the past, including a classic snickerdoodle, a gluten-free snickerdoodle and even a caramel apple snickerdoodles. But then I had leftover pumpkin puree from baking my pumpkin chocolate chip cookies and I thought, I gotta use this up before it goes bad! And yes, pumpkin snickerdoodles are exactly as amazing as they sound.
My brother, it turns out, happens to be a fanatic about snickerdoodles. Which is something I did NOT know about. But he basically scarfed up a bunch of the cookies and then took the rest of them home with him. Which was fine by me, as I didnt need them around taunting me.
Making the pumpkin snickerdoodles is easy. First you cook the pumpkin puree, reducing it so you have less moisture and more pumpkin flavor. Remove it from the stovetop and let it cool.
While its cooling, mix together butter, sugar, brown sugar, vanilla, pumpkin spice, cinnamon, salt, baking soda, cream of tartar. Once blended, add in an egg yolk. Then add the cooled pumpkin puree. Add the flour and youve got cookie dough!
Form cookie dough balls and roll in a pumpkin spice & sugar mixture. Then bake. Youve got pumpkin snickerdoodles!
The biggest issue with pumpkin snickerdoodles is the pumpkin makes the cookie cakey. I wanted a cookie that wasnt as cakey and that had a similar texture to classic snickerdoodles. That required me cooking down the pumpkin first! This extra step removed the water in the pumpkin puree and intensified the pumpkin flavor as well.
However if you find the cooking step fussy, you can skip it! Just keep in mind that the cookie will be much more cakey and taste less pumpkin-y if you do skip this method. I highly recommend also using a standard grocery store pumpkin puree like Libbys. Other pumpkin purees, especially organic brand ones, are much more watery and will lead to even more cakey texture.
This recipe was developed with Libbys brand pumpkin puree. It is not designed for pumpkin pie filling, which already has sweeteners, thickeners and spices added so I dont recommend using pumpkin pie filling.
I have found other brands of pumpkin puree, especially organic ones, tend to be more watery. Libby pumpkin puree is stiff, like homemade mashed potatoes. If you dont use Libbys and use a different brand of pumpkin puree that feels more watery, I suggest you start with 2/3 cup of pumpkin puree and cook it a little it longer to reduce it down to 1/4 cup.
You can totally make your own pumpkin pie spice blend from common pantry ingredients! I have a recipe for homemade pumpkin spice. Or, if you dont feel like mixing up a large batch of pumpkin spice, increase the cinnamon to 1 teaspoon in the cookie dough and add an additional 1/4 teaspoon of nutmeg and ground ginger. In the sugar coating, use 1 1/2 teaspoons of cinnamon and add in 1/4 teaspoon nutmeg and ground ginger.
Store the cookies at room temperature in a resealable Ziploc bag or an airtight container. The cookies will keep for up to 3 days.
Yes! You can totally freeze these cookie. Freeze them in an airtight container or resealable Ziploc bag. The cookies will keep up to 3 months in the freezer. Just thaw them out by placing them on the kitchen counter or table. The cookies should be back to room temperature in about 30 to 45 minutes, depending on how warm your kitchen is.
You can freeze the cookie dough easily but you need to do it BEFORE you coat the cookie! Just make the dough, form them into balls, then freeze them on a baking sheet for about 1 to 2 hours, or until they are frozen through. Then store them in a resealable Ziploc bag. Thaw them out on the countertop for about an hour, then roll the thawed dough in the pumpkin spice sugar coating. Bake as directed.
The post Pumpkin Snickerdoodles appeared first on Eat The Love.
]]>Okay, lets get this out of the way right now. Butterfinger Candy Bar Cookies are awesome! Really. These lovely cookies have everything you want in a cookie. Theyre rich, decadent and filled with Butterfinger candy bars. That means theyre also loaded with chocolate and peanut butter. Yum!
I was not actually planning on posting this recipe before the New Year. But John got a text from a large church in Houston who received some of these cookies. They liked them so much they wanted to put them on a regular cafe menu for their church. So I decided to go ahead and post this recipe now because they wanted the recipe.
After Halloween, I asked my husband to go buy a bunch of candy on sale so I could bake with it. He got 6 or 7 different kinds of candy. So I had tons of candy laying around my house and needed to start using it up. I decided to use up some of the Butterfinger Candy Bars as cookies.
I started with a favorite recipe and realized immediately that wasnt going to work and improvisations were going to be required. Second batch: I added a little flour. That still didnt work. My husband looked at me and said most of these candies have a lot of oil (from the chocolate, peanut butter and sometimes caramel in their contents). Ding, ding, ding, ding. The lightbulb went off and I realized I needed to cut out some of the butter. That was the big difference.
The third batch I decreased the butter by 1/2 cup and increased the flour by 1/3 cup. That seemed to work with almost all of the candies except those that have a lot of flour content in them already. Those batches (using different candy bars) needed the decrease in butter but not a corresponding increase in flour. (Im sorry, I know this is getting into the weeds).
I made four batches of this recipe at a time. Several other times I made eight batches instead of four. Thats a lot of cookie dough! I didnt want to take time to roll out ALL of that cookie dough so I decided to scoop the dough instead. I knew it would be a lot easier and a lot quicker. Do understand that scooping the dough makes monster size cookies. They will take much longer to bake. But oh, so worth it!
I made these cookies for our annual Christmas Cookie Extravaganza this year. I was in the middle of baking hundreds and even a thousand cookies a day for a two week period. My pictures reflect the second version of this cookie rather than the third version which was spectacular. The cookies will have more body and be thicker than those in my pictures following this recipe. Thats okay. Thats the way theyre supposed to turn out.
Butterfinger Candy Bar Cookies are dynamic. Seriously. These cookies will knock your socks off. If you need a cookie for holiday parties or Christmas Cookie Exchanges, this is it! Theyre also marvelous for tailgating parties, potlucks and any time you need a dose of chocolate.
Butterfinger Candy Bar Cookies are spectacular!
This is a great recipe to use up leftover Halloween candy!
Every bite will have you drooling!
We loved the taste of Butterfinger Candy Bar Cookies.
Heres what I did.
I used these ingredients. In subsequent batches I used only two sticks of butter and more flour.
Place two sticks (1 cup) softened butter in a mixing bowl. Add eggs, brown sugar, granulated sugar, vanilla, sea salt and baking soda.
Cream ingredients with an electric mixer until smooth. If your butter isnt soft enough it will take longer to get the hardened pieces of butter mixed in. However, you dont want to use melted butter. That changes the consistency of the cookie.
Add UNBLEACHED all-purpose flour (bleached flour toughens baked goods). Add chopped Butterfinger Candy Bars.
Stir ingredients with a heavy spoon until every crumb is worked into the dough! Do not leave any remnants of dry flour. Keep stirring! I prefer to do this by hand because using a mixer can toughen the cookies.
Scoop cookie dough with a one-quarter cup cookie scoop. I patted the cookie dough into the scoop to make the ingredients adhere a little better.
Place cookie dough on well-greased cookie sheets. Space the dough apart so there are several inches between cookies because the cookies will spread while baking.
Bake at 350 on convection bake for about 13-15 minutes for a single cookie sheet. I was baking 3 racks in each oven at a time. My cookies took 19-22 minutes to bake completely. Rotate cookies on racks every six minutes while baking.
Butterfinger Candy Bar Cookies really taste heavenly.
These are terrific cookies for any kind of party. They will be gobbled up in no time.
Look at all that Butterfinger Candy Bar goodness!
Heres the recipe.
(My own concoction)
NOTE: These are also good baked as brownies. Spread into a 10x15 cookie sheet and bake about 30 minutes at 350.
NOTE: These cookies spread a LOT while baking. You need to space them farther apart than normally.
NOTE: I do not recommend rolling these cookies as they spread out way too much that way. The best option is to use a very large cookie scoop and place the cookies about three to four inches apart on large cookie sheets.
NOTE: I was baking three racks at a time. I rotated the cookies every six minutes while baking. My cookies took between 20-24 minutes to cook completely.
NOTE: I used the convection bake feature on my oven.
NOTE: These cookies are not done until they have puffed up and the tops have dried so that there is no moisture showing. This usually takes between 19-21 minutes (sometimes longer). If you take the cookies out prematurely they will cave and collapse in the middle about a minute or two after removing from oven. The inside of the cookies will be undercooked.
NOTE: Because of the oil and sugar content in the candies, these cookies need more flour than most or they will spread too much in the pan. Make sure you stir the cookie dough together thoroughly before using. Stir in every crumb!
NOTE: Please see the tips at the top of this post for the best success in making these monster-sized cookies.
NOTE: My pictures were taken after the second try. The third try was better with a little more flour added. The recipe card shows my corrections in ingredients. The pictures, however, do not reflect the actual body of the cookie quite as well. The cookies will be about one and a half to twice as thick as the ones pictured here. Unfortunately, I was baking so many hundreds of cookies that day that I didn't have time to show cookies that reflect my recipe changes.
Butterfinger Candy Bar Cookies will rock your world!
I could have eaten a dozen of these cookies in one sitting.
Butterfinger Candy Bar Cookies is a splendid way to enjoy Butterfinger Candy Bars!
Butterfinger Chocolate Chip Cookies
NOTE: These are also good baked as brownies. Spread into a 10x15 cookie sheet and bake about 30 minutes at 350.
NOTE: These cookies spread a LOT while baking. You need to space them farther apart than normally.
NOTE: I do not recommend rolling these cookies as they spread out way too much that way. The best option is to use a very large cookie scoop and place the cookies about three to four inches apart on large cookie sheets.
NOTE: I was baking three racks at a time. I rotated the cookies every six minutes while baking. My cookies took between 20-24 minutes to cook completely.
NOTE: I used the convection bake feature on my oven.
NOTE: These cookies are not done until they have puffed up and the tops have dried so that there is no moisture showing. This usually takes between 19-21 minutes (sometimes longer). If you take the cookies out prematurely they will cave and collapse in the middle about a minute or two after removing from oven. The inside of the cookies will be undercooked.
NOTE: Because of the oil and sugar content in the candies, these cookies need more flour than most or they will spread too much in the pan. Make sure you stir the cookie dough together thoroughly before using. Stir in every crumb!
NOTE: Please see the tips at the top of this post for the best success in making these monster-sized cookies.
NOTE: My pictures were taken after the second try. The third try was better with a little more flour added. The recipe card shows my corrections in ingredients. The pictures, however, do not reflect the actual body of the cookie quite as well. The cookies will be about one and a half to twice as thick as the ones pictured here. Unfortunately, I was baking so many hundreds of cookies that day that I didn't have time to show cookies that reflect my recipe changes.
Can you believe were about to embark on a new decade? Lets call it the roaring 2020s as we move towards a high-tech time of reinvention and reinvigoration. And part of that might include some home renovations. Theres no better time to rethink your kitchen and bring it into fashion with the new year then when a new one commences.
This might include splurging on new countertops, floors, backsplashes, and more. But the centrepiece of your kitchen is always the appliances. These are the functional items you use every day, whether its to prep, store or cook your food, or clean your dishes when youre done.
You can go big with an entire new set of major appliances or start with some cool new small appliances to complement the set-up.
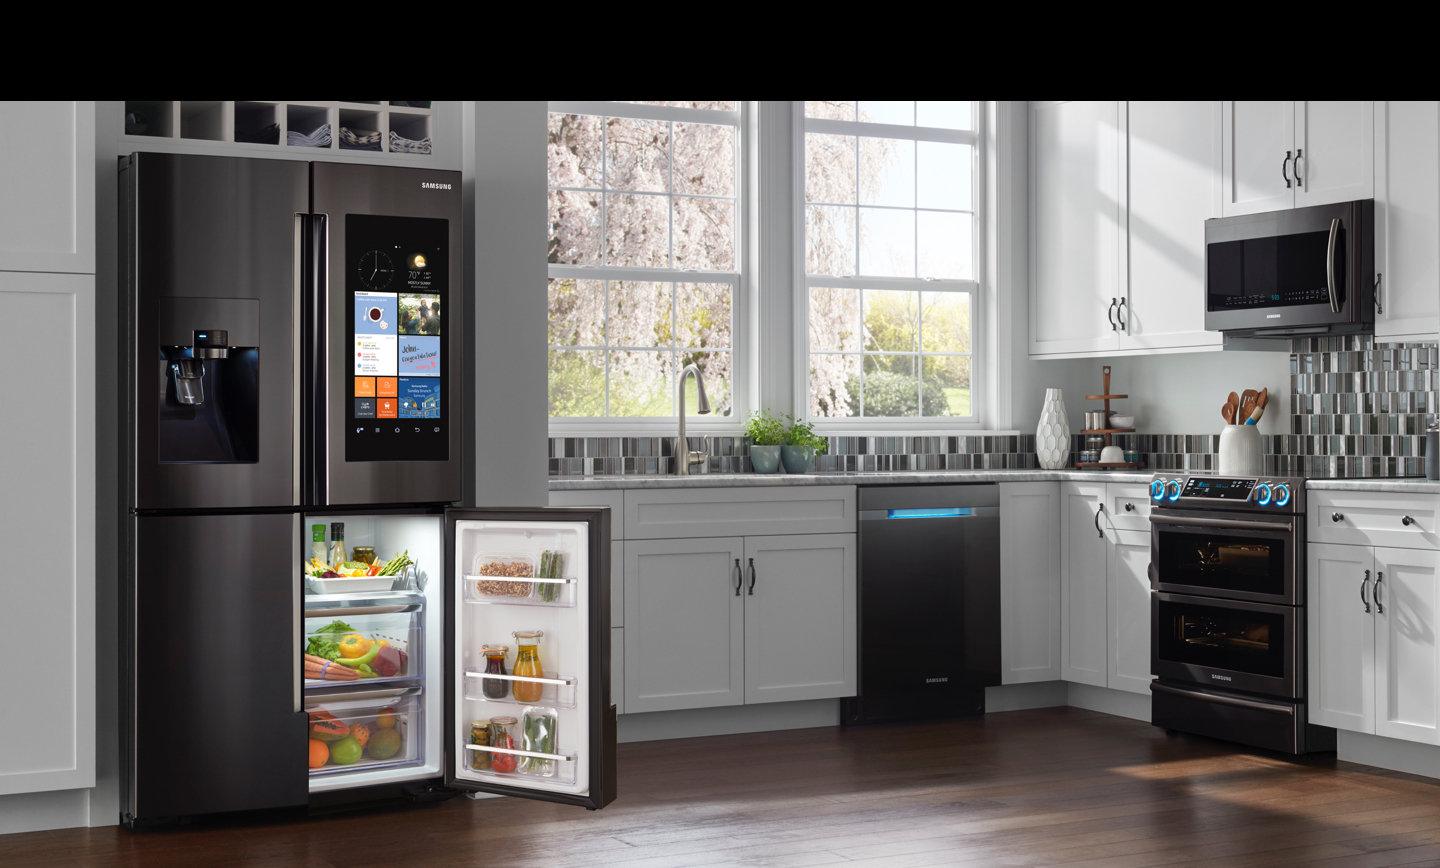
Theres a new trend toward black stainless steel appliances. If you want to jump aboard, that might include upgrading everything so they all match.
Starting with a refrigerator, consider one like the Samsung Family Hub, which is both super sleek in design and really high-tech. It has a Wi-Fi-enabled touchscreen on the front door that you can use for information, entertainment, checking schedules, and more. A new feature will even provide a word of the day and fun facts to get your morning going. Plus, it has three cameras inside that can display what food is inside on the touchscreen to prevent you from having to constantly open and close the door and let the cold air out.
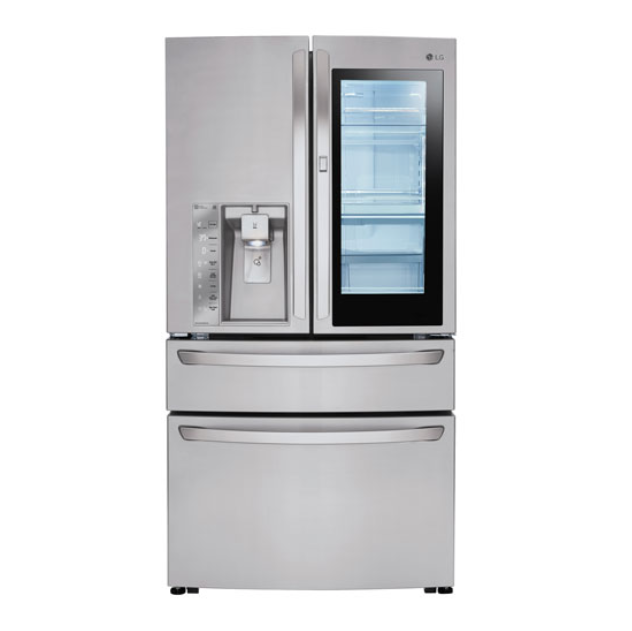
If you want to stick with a more traditional stainless finish, you can get the Family Hub in that, too. Or look at options like the LG Instaview refrigerator, which can also show you whats inside by simply knocking twice on the outside of the glass to illuminate the interior. Plus, theres a door-in-door design so you can store things like snacks and drinks in the outer door for quick and easy retrieval.
For something simpler, there are options like the Insignia 30 bottom freezer refrigerator that has a 6.6-cubic-foot bottom freezer with Pull-out drawer for keeping frozen foods separate and easily accessible.
If you prefer to stick to more traditional white, there are refrigerators like the Insignia 31 bottom freezer refrigerator that comes in crisp white with the same Pull-out drawer in the freezer and a frost-free design.
Next is a dishwasher. If youre sticking with the black stainless steel trend, they come from a variety of different manufacturers. The Bosch 24 Dishwasher has a stainless steel tub and operates at a quiet 42dB. A third rack is included to accommodate more items, which is ideal for large families or those who entertain often. Just make sure that if youre buying black appliances separately, the shade of black matches with the rest.
An option for a finish other than black could be the more traditional Whirlpool 24 50dB built-in dishwasher, which comes in a monochromatic stainless steel finish. It, too, has a third level rack and can hold up to 12 place settings.
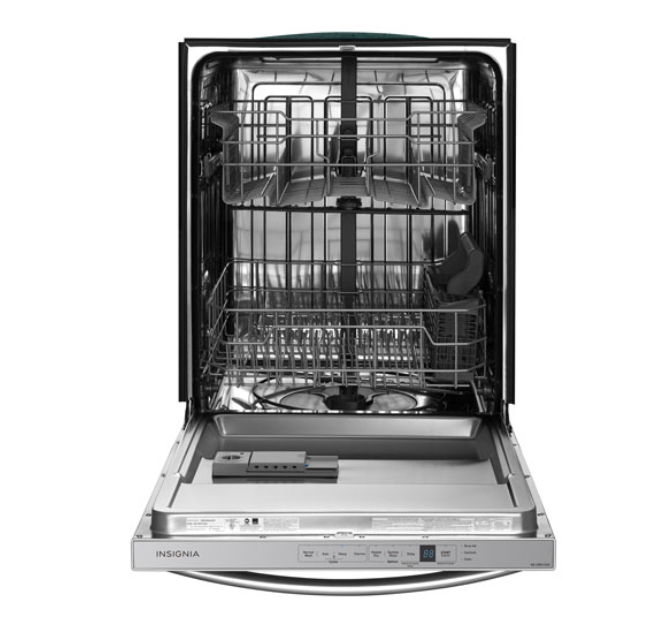
Another traditional option in terms of silver stainless finish is the Insignia 24 51dB built-in dishwasher, that has a convenient delay start option so you can set it to clean anywhere from one to 24 hours after its full. This can help you save on energy costs if electricity is cheaper during certain hours in your province, for example.
The final piece of the major appliances puzzle for your kitchen is the oven/range. You can opt for gas (if you have a gas line in your home), electric, or dual fuel. I like and use dual fuel because I find that gas burners work better while an electric oven is more favourable. If you want to go the dual fuel route, the GE Profile 30 Self Clean True Convection 5-Burner Slide-In Dual Fuel Range comes in traditional stainless steel and is even Wi-Fi-connected so you can control it from your phone.
If youre looking for a black stainless steel stove to match other new appliances, theres the Samsung 30 True Convection Freestanding Smooth Top Electric Range, that has an extra-large 12 element for accommodating larger pots and pans and a keep warm zone that can keep food warm while you rally the family for dinner.
Note that if youre planning to do a complete kitchen renovation and upgrade everything, it might be wise to look into kitchen appliance packages that include multiple matching appliances sold together at a discount. Theres a package from Frigidaire, for example, that includes a 30 top freezer refrigerator, an electric range, and a dishwasher that even comes with a new matching cookware set. Or, if you want to stay on trend with black stainless, theres a Samsung packagethat includes a 36 French Door refrigerator, electric range, and dishwasher, all of which come in that stylish finish, along with an 11-piece stainless steel cookware set from Cuisinart.
Whatever you do, make sure you get the right sizes of each appliance to fit in your kitchen, especially if the appliances will be built in or slide in. Make sure they all match, or if youre buying one new item, or planning to upgrade one by one, that it at least looks good with appliances you already have until you budget to continue updating.
If you arent ready for a complete overhaul, you can also make some small renovation touches to your kitchen, including adding new small countertop appliances to give your kitchen some extra flare.
I love red, which I find stands out nicely on a countertop and matches with virtually any dcor and design. A sleek and sexy mixerwould look great on any countertop. The KitchenAid Custom Stand Mixer comes in many finish options, including a glossy empire red. It has a large 4.5-quart stainless steel mixing bowl for whipping up big batches or food, dough for homemade bread, and batter for desserts.
No kitchen is complete, in my opinion, without a multicooker. My favourite option in this category is the Instant Pot. I have the Ultra 10-in-1 model that is perfect for pressure cooking all kinds of food, from meats, poultry, and fish to vegetables, potatoes, and corn. You can make chili, bake cakes (Ive made both chocolate lava cakes and even cheesecake!), and even your own homemade yogurt.
One neat small appliance you might have had your eye on but dont yet own is an air fryer. The Insignia Air Fryer is made of stainless steel to match other silver stainless appliances and can be used to cook everything from fried chicken to nuggets, appetizers, French fries, and more in a much healthier way, using very little to no oil.
Whether youre planning to completely gut your kitchen and start anew for 2020, or just want to update it with some sleek and sexy small appliances, there are lots of appliance options from which to choose. Just make sure to get items that match not only one another but with the overall look and feel of your kitchen, and the rest of its dcor.
Theres no better to get you started for the new year than having a brand new kitchen. Kitchens are often where families get together in the home, and its always where people congregate during a gathering. So its the one room of your home that, with a refresh for 2020, can get you geared up for the new year to come.
Check out plenty of appliances for the kitchenat Best Buy Online.
The post Start off the 2020s with a New Kitchen Renovation appeared first on Best Buy Blog.
]]>